DevServer Upgrades
Out of stock, forever.
That's how it feels waiting for the CM5 IO Case stock to replenish on the pi hut. So I decided to build my own. It can't be that hard, surely? Obviously it wouldn't be a pro finish as I am not a professional case maker, but I can give it a shot.
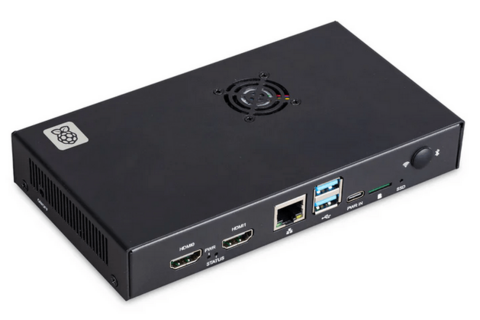
ABS Junction Box
I was searching through eBay when some generic ABS junction box/project box/enclosures popped up. Fairly cheap for what they are and they look quite nice. There's a few sizes and one caught my eye as it would fit the CM5 IO Board, plenty of room too at 200mm long, 75mm high and 100cm wide. I decided to try one, at 7£ it was half the price of the official metal enclosure with alternatively nice looking ABS, looks drillable, comes with a waterproof seal and a screwdriver (I love getting mini screwdrivers with things!)
Finding a bargain
After I had paid for the ABS junction box something else caught my eye, it was an active cooler by WaveShare for the CM4. Most CM4 add-ons are compatible with the CM5 and at 5£ I really couldnt go wrong, it would fit on something. That item went straight through buy it now and all I had to do now was sit back and wait, I was already buying a 128gb 2230 nVME for another project so I thought why not, treat yoself.
Equipment Arrival
All arrived safe and sound, but alas. Upon unwrapping the active cooler and inspecting it I noticed it was a 4pin 5v connector which the official RaspberryPi IO board does not have. Gutted. Then a thought occurred, this was not the only carrier board I had for the CM4/CM5, I also had a WaveShare CM4 Mini Baseboard C which infact did have a 4pin 5v connector, so all was not lost as that is going to be used in another project I'm currently working on.
Adding standoffs & drilling ports
This was the most nerve-wracking part of the whole saga. Fixing in the standoffs was easy enough. Using a piece of paper I marked out the holes in the IO board and drilling them, attaching with a black m2 bolt and standoff. Drilling the ports however was a another nightmare entirely, having to re-drill the power port countless times. Luckily, I only needed to drill that port out as this system is completely headless and doesn't currently require anything connected to the other ports until I install PoE. Fairly simple at first but the cable seemed to have issues going in fully, plenty of re-drilling and it finally went in all the way and while it didnt end up looking great, it's at the back so it won't be visible.
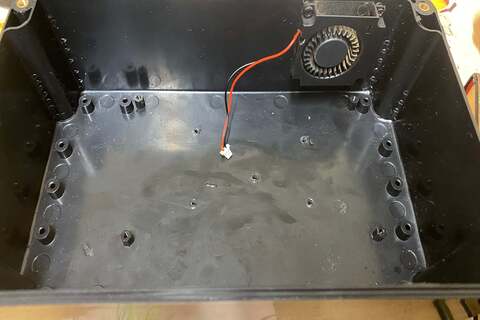
Now for ventilation
Ventilation in this is going to be extremely important. The case itself is 200mm long by 100mm wide which sways in our favour, as there is more air mass inside the object to move creating a cooler temp for the CM5 to run, preventing throttling. The dev server will have lots of processess running at once so this is critical. Having the active cooler not fit is a bit of a hurdle, but not as big as a hurdle if I did not have a 5v fan spare.
After drilling the holes and installing the 5v fan, placing it incorrectly and then moving it into the correct position leaving lots of holes in the wrong place, (it's just more ventiilation dont worry) I attached the 5v wire and the GND wire into the correct GPIO pins. This IO board follows the same pinout as the Pi5, so we can use that as a reference.
I had to attach this fans wires to a female to female dupont wire as there was no other way of connecting it, a gentle tug ensures it's connected properly. I then glued these to the side, positioning them apart from each other to prevent shorting.
First Boot
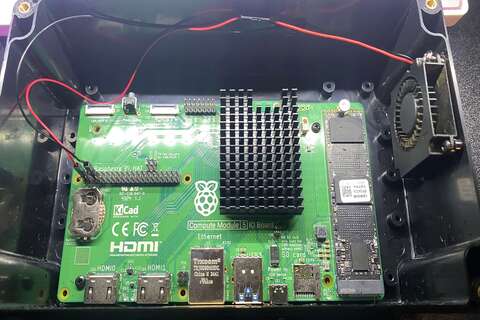
Always a nerve wrecker, this one. Especially as the fan did not start spinning! Panic for a moment, noticed LED activity, quick prod of the power wire and the fan starts spinning at full speed. Phew. Just a loose connection. Even though I always wear my ESD bracelet when working with any open boards I do always worry.
RPM Over 9000
This is one issue we are going to encounter due to the fan we are using is a simple 2 wire 5v fan, it doesn't have a pwm/fan controller wire. No fan controller means the fan will simply run at full power (5v), full speed. Not usually a problem however I think this fan is quite old because it's a tad on the noisy side. I will have to look into getting a different fan for this, but it will suffice for now.
:wq

I have the perfect sticker for this box. found it while searching for a new Vim sticker for my laptop, a large :wq command
Final Thoughts
Well that was fun! Bar the stress of drilling the ports and the downer of the active cooler being the wrong connection (my fault for not double checking), this little project turned out quite well and a much better improvement over it's old housing of it's cardboard box that it was shipped in.

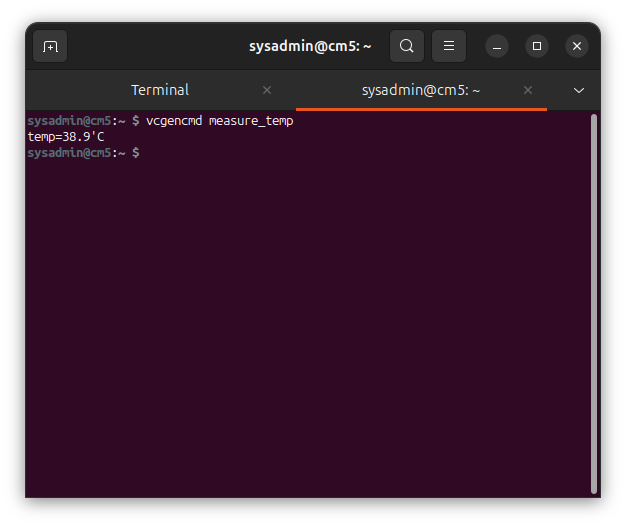
It was heating up and running at unsafe temperatures, now it runs at a lovely 38c even when connected to the DevServer via SSH in VSCode and operating other processes such as Docker, k3s and mariadb.
I will definitely be buying more of these, they look great. Compute modules and carrier boards fit in them nicely, they drill really well and are extremely strong as well as being waterproof with the seal that comes with it. Even after drilling and not sanding they still look acceptable. Good value and great for quick projects to prevent dust and electro static discharge, the worst enemy of all.
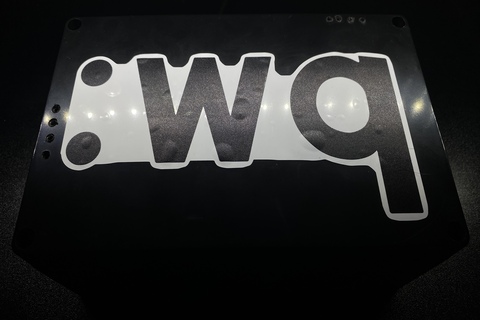
Looks great, doesn't it?
Now onto some different projects, next time we will be peeking at Pimoroni's PicoSystem, building a Pi NAS & mediacenter, which luckily, our active cooler will come in use for ( now you know why I was buying a 2230 nVME!) and other cool stuff involving portable dev envrionments, building a homelab server, tweaking my Pi Zero2 and more.

- Dru